JackCarver
Well-known Member
Note: This is a translation of the German how-to provided by Gerd and JackCarver in the German Forum.
This how-to is for experienced users only. You should have some basic experience with routers and computers to install and configure the TomatoUSB firmware. If something goes wrong when flashing the firmware you might brick your device – depending on your router this might be hard to impossible to fix.
Perfect Privacy offers pre-configured routers in cooperation with Flashrouters.com. When ordering a router from Flashrouter you have the option to have it come with either DD-WRT or TomatoUSB.
Note that when ordering routers in the USA, it cannot be guaranteed that the hardware has not been tampered with, according to journalist Glenn Greenwald.
You can find the pre-configured routers for Perfect Privacy here.
An alternative to routers pre-flashed with DD-WRT or TomatoUSB is using Asus router with the original firmware. Hidemyass has tested vpn configurations on the following routers: Asus RT-N16, Asus RT-N66U, Asus RT-AC66U, Asus RT-AC68U and Asus RT-AC87U. These are easy to configure and all you need it to import the iOS configuration file "Servers grouped UDP" and add your Perfect Privacy user credentials and the DNS servers.
Additional Information:
For this howto we used a WRT54GL router. With the help of this howto it should not be problematic to adjust the configuration for similar routers. You can find a list of compatible and most popular routers further below.
1) Preparation
You will need a router that supports the TomatoUSB Mod (with VPN) from Shibby. List of Compatible routers.
I recommend using a router that supports firmware with kernel 26 or higher, because Shibby no longer supports Kernel 24. Not all of the compatible router that are listed with "K26" will be able to run Kernell 26 with VPN. You should make sure that the size of the firmware does not exceeed the memory size of the router. (Aslso, "Policy Based Routing" as listed under 6) will not work with K24, only K26 and above).
According to the TomatoAnon Database the most popular routers are:
1. Asus RT-N66U (CPU 600MHz)
2. Asus RT-N16 (CPU 480MHz)
3. Netgear WNR3500L V2 (CPU 480 MHz)
4. Asus RT-AC66U (CPU 600MHz)
5. Linksys WRT54G/GS/GL (GL-DE V1.1 CPU 200 MHz)
The VPN speed depends on the CPU in the router, the server location and your ISP. Theoretically, with a better CPU you should get faster VPN speeds. There are several routers that offer high performance CPUs:
Netgear R7000 (CPU 2x1000MHz)
Asus RT-AC68U (CPU 2x800MHz)
Asus RT-AC56U (CPU 2x800MHz)
(For further technical details, check the DD-WRT Wiki)
For comparison: With a Netgear R7000 speeds of 20 to 30Mbit/s should be possible if not limited by other means.
Table for WRT54/GL/GS Router
In the table you can see that the WRT54/GL/GS router supports both Kernel 24 and Kernel 26.
The current firmware for the WRT54GL with Kernel 26 is already over 4 MB. But the actual limit for firmware on this device is limited to 3.68 MB. The only firmware supporting VPN that fits is running on Kernel 24. Because of this we will be using the TomatoUSB firmware "tomato-ND-1.28.5x-110-VPN.trx" in the K24 directory, which is 3.47 MB in size.
Current list of firmwares.
For a firmware for the Asus RT-AC66U router I would recommend the following:
After downloading change the file extension of the .trx file to ".bin". In this example rename "tomato-ND-1.28.5X-110-VPN.trx" to "tomato-ND-1.28.5X-110-VPN.bin".
2.1) General information about flashing the firmware:
To avoid errors during the flash process it is important to pay attention to each individual step. Before and after flashing the firmware a hard-reset ("30/30/30") should be issued (Detailed description)
With a hard-reset all settings in the NVRAM will be set to factory default. If there is no corresponding DD-WRT Micro firmware, you will need to flash the DD-WRT Mini firmware first. Depending on the router the flash process can take several minutes. Under NO circumstances interrupt this process.
2.2) Firmware Upgrade
First issue a hard-reset and loginw ith the default credentials. In most cases this is:
user: root
password: admin
Then upgrade the firmware to DD-WRT Micro or Mini Generic.
If the firmware has already been upgraded you can continue at step 2.3
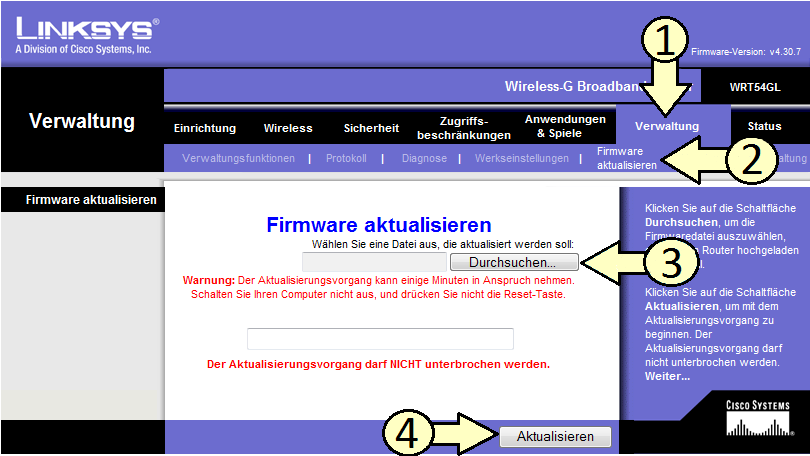
Configuration menu for the WRT54GL router with the original firmware:
Click on "Durchsuchen"/Choose File.." (marked as 3 in the screenshot below) and select the file "dd-wrt.v24_micro_generic.bin" that you renamed before.
2.3) After the DD-WRT upgrade has finished, issue another 30/30/30 hard-reset.
Issue the following command via the menu Adminstration -> Commandes -> Command Window" to determine the maximum possible size for the TomatoUSB Mod firwmware:
Next proceed with the upgrade to a suitable TomatoUSB Mod firmware:
For this example with the WRT54GL router we click on "Choose File" (marked as 4 in the screenshot above) and select the file "tomato-ND-1.28.5X-110-VPN.bin". Once the upgrade has finished, issue another 30/30/30 hard-reset.
This how-to is for experienced users only. You should have some basic experience with routers and computers to install and configure the TomatoUSB firmware. If something goes wrong when flashing the firmware you might brick your device – depending on your router this might be hard to impossible to fix.
Perfect Privacy offers pre-configured routers in cooperation with Flashrouters.com. When ordering a router from Flashrouter you have the option to have it come with either DD-WRT or TomatoUSB.
Note that when ordering routers in the USA, it cannot be guaranteed that the hardware has not been tampered with, according to journalist Glenn Greenwald.
You can find the pre-configured routers for Perfect Privacy here.
An alternative to routers pre-flashed with DD-WRT or TomatoUSB is using Asus router with the original firmware. Hidemyass has tested vpn configurations on the following routers: Asus RT-N16, Asus RT-N66U, Asus RT-AC66U, Asus RT-AC68U and Asus RT-AC87U. These are easy to configure and all you need it to import the iOS configuration file "Servers grouped UDP" and add your Perfect Privacy user credentials and the DNS servers.
Additional Information:
For this howto we used a WRT54GL router. With the help of this howto it should not be problematic to adjust the configuration for similar routers. You can find a list of compatible and most popular routers further below.
1) Preparation
You will need a router that supports the TomatoUSB Mod (with VPN) from Shibby. List of Compatible routers.
I recommend using a router that supports firmware with kernel 26 or higher, because Shibby no longer supports Kernel 24. Not all of the compatible router that are listed with "K26" will be able to run Kernell 26 with VPN. You should make sure that the size of the firmware does not exceeed the memory size of the router. (Aslso, "Policy Based Routing" as listed under 6) will not work with K24, only K26 and above).
According to the TomatoAnon Database the most popular routers are:
1. Asus RT-N66U (CPU 600MHz)
2. Asus RT-N16 (CPU 480MHz)
3. Netgear WNR3500L V2 (CPU 480 MHz)
4. Asus RT-AC66U (CPU 600MHz)
5. Linksys WRT54G/GS/GL (GL-DE V1.1 CPU 200 MHz)
The VPN speed depends on the CPU in the router, the server location and your ISP. Theoretically, with a better CPU you should get faster VPN speeds. There are several routers that offer high performance CPUs:
Netgear R7000 (CPU 2x1000MHz)
Asus RT-AC68U (CPU 2x800MHz)
Asus RT-AC56U (CPU 2x800MHz)
(For further technical details, check the DD-WRT Wiki)
For comparison: With a Netgear R7000 speeds of 20 to 30Mbit/s should be possible if not limited by other means.
Table for WRT54/GL/GS Router

In the table you can see that the WRT54/GL/GS router supports both Kernel 24 and Kernel 26.
The current firmware for the WRT54GL with Kernel 26 is already over 4 MB. But the actual limit for firmware on this device is limited to 3.68 MB. The only firmware supporting VPN that fits is running on Kernel 24. Because of this we will be using the TomatoUSB firmware "tomato-ND-1.28.5x-110-VPN.trx" in the K24 directory, which is 3.47 MB in size.
Current list of firmwares.
For a firmware for the Asus RT-AC66U router I would recommend the following:
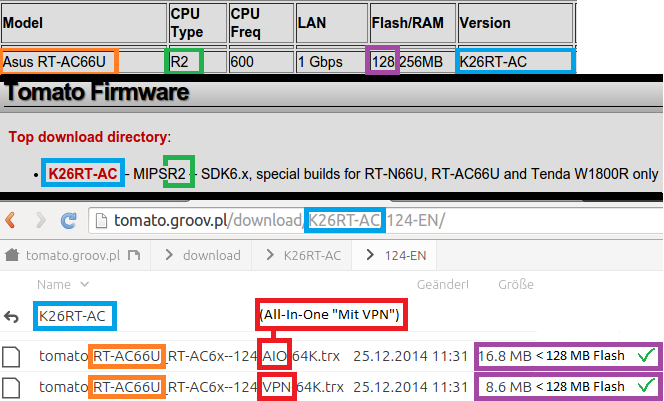
- Take note of the router version number in the table.
- Choose the Version "K26RT-AC" in the firmware list.
- Check for the label "RT-AC66U".
- Make sure the firmware does not exceed 128MB
- Choose a version with "VPN" or "AIO".
After downloading change the file extension of the .trx file to ".bin". In this example rename "tomato-ND-1.28.5X-110-VPN.trx" to "tomato-ND-1.28.5X-110-VPN.bin".
- You will need a compatible DD-WRT Micro of Mini Genertic Firmware from the router database
- Register with Perfect Privacy, if you don't have an active account
- Download the OpenVPN configuration files
- In the downloaded archive, copy the certificates of a server of your choice into a seperate directory
- ca.crt (the same for all servers)
- Amsterdam.ovpn
- Amsterdam_cl.crt
- Amsterdam_cl.key
- Amsterdam_ta.key
2.1) General information about flashing the firmware:
To avoid errors during the flash process it is important to pay attention to each individual step. Before and after flashing the firmware a hard-reset ("30/30/30") should be issued (Detailed description)
With a hard-reset all settings in the NVRAM will be set to factory default. If there is no corresponding DD-WRT Micro firmware, you will need to flash the DD-WRT Mini firmware first. Depending on the router the flash process can take several minutes. Under NO circumstances interrupt this process.
2.2) Firmware Upgrade
First issue a hard-reset and loginw ith the default credentials. In most cases this is:
user: root
password: admin
Then upgrade the firmware to DD-WRT Micro or Mini Generic.
If the firmware has already been upgraded you can continue at step 2.3
Configuration menu for the WRT54GL router with the original firmware:
Click on "Durchsuchen"/Choose File.." (marked as 3 in the screenshot below) and select the file "dd-wrt.v24_micro_generic.bin" that you renamed before.
2.3) After the DD-WRT upgrade has finished, issue another 30/30/30 hard-reset.
Issue the following command via the menu Adminstration -> Commandes -> Command Window" to determine the maximum possible size for the TomatoUSB Mod firwmware:
Code:
echo "$((0x`cat /proc/mtd | grep linux | awk '{ print $2 }'`)) bytes available for firmware"Next proceed with the upgrade to a suitable TomatoUSB Mod firmware:
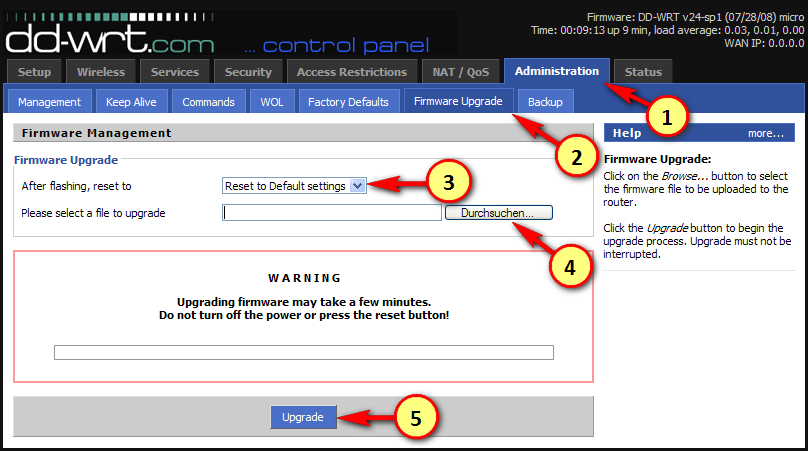
For this example with the WRT54GL router we click on "Choose File" (marked as 4 in the screenshot above) and select the file "tomato-ND-1.28.5X-110-VPN.bin". Once the upgrade has finished, issue another 30/30/30 hard-reset.
Last edited by a moderator: